

My Recordings is your place to listen to the voices you have collected, arrange them, and choose how you want to enjoy them. You can listen and download without editing your recordings or purchasing a keepsake.
Sign in to My Account and open My Recordings for the event you want. The links at the top of the page take you to Listen & organize, Download, Your keepsakes, or Share.
Prefer to watch? Try the short, silent demonstrations for downloading a combined MP3 and organizing, Trash, and restore. You can also follow the written instructions below.
Select the heading and chevron to open Transcription Tools, Add recordings from your device, or Trash & Restore. Small ? buttons explain less familiar controls; select them or focus them with your keyboard.
Listen and arrange your recordings
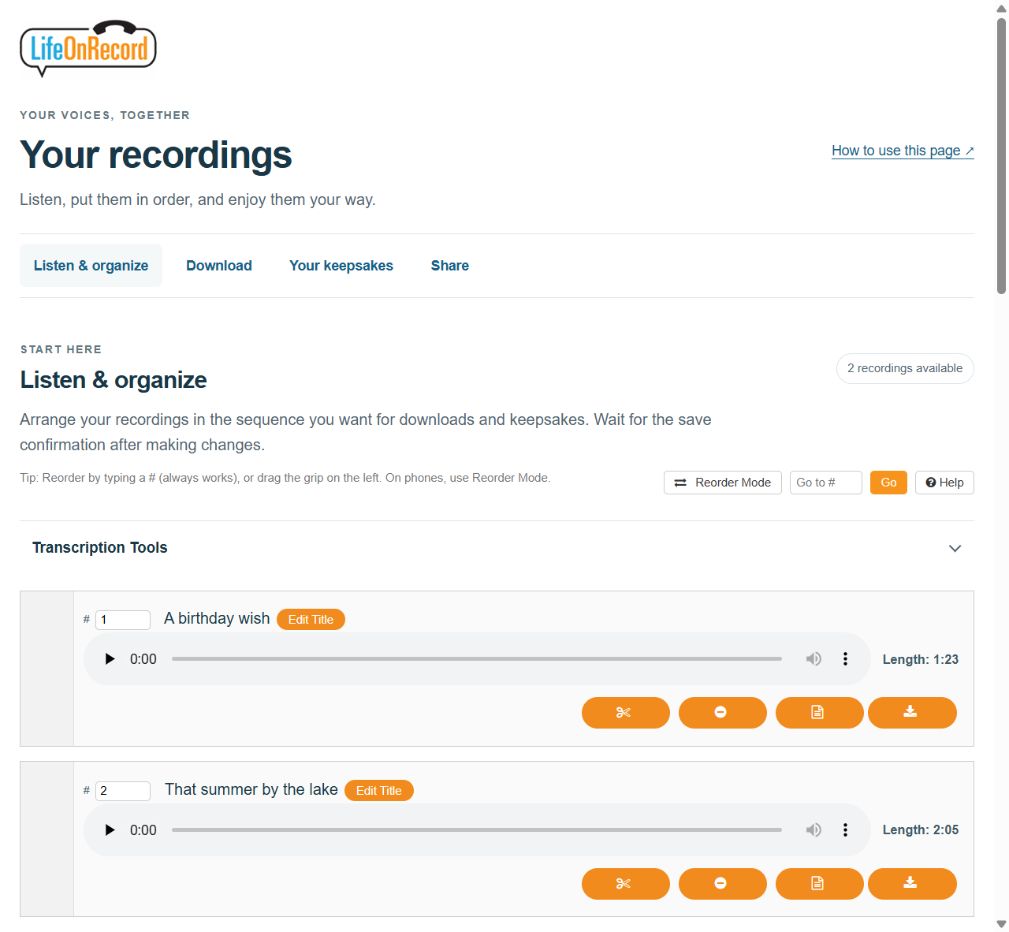
The Length beside each player shows how long the recording is before you press Play. Press Play to listen. Use Edit Title to change its displayed title, then select Save Title.
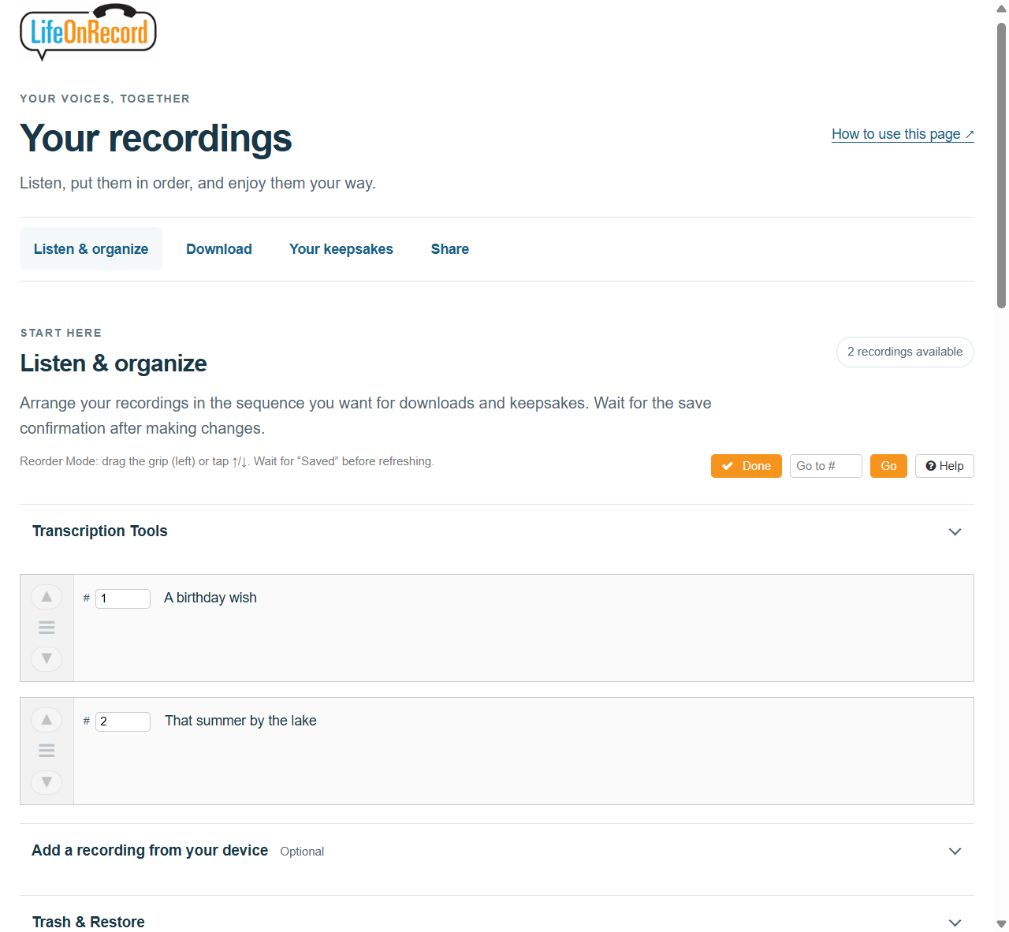
To change the order, turn on Reorder Mode. Use the Up and Down controls, drag the grip, or enter the recording’s new position in its track-number box. On a phone, the Up and Down controls are often easiest.
Wait for Saved after changing the order before refreshing or leaving the page. The sequence you choose is used for downloads and keepsakes. Go to # lets you jump to a recording in a long list.
Do not want a recording in your selection? Select its Move to Trash control (the minus-circle icon), then confirm with OK. To bring it back, open Trash & Restore and select Restore.
47 seconds. Captions are included. Press Play to start; pause or go full screen whenever you like.
Read the demonstration steps
- Select Reorder Mode. Use the arrow controls to arrange your recordings.
- Use the Up arrow to move this recording. Up and Down work on a phone or a computer.
- Wait for Saved, then select Done. Downloads and keepsakes follow your saved sequence.
- Select Move to Trash to leave out a recording. You can bring it back from Trash later.
- Confirm with OK to move it to Trash. Choose Cancel if you want to keep it in the active list.
- Open Trash & Restore below the list. Recordings in Trash are left out of downloads and keepsakes.
- Select Restore beside the recording. You will be asked to confirm.
- Confirm with OK to bring it back. The recording returns to the end of the active list.
- Wait for Saved and check the sequence. Use Reorder Mode again if you want to move it.
Waiting for recordings from a rented phone? Call-in recordings may already be visible. Recordings stored on your vintage or retro phone appear after we receive the phone back and process them. The phone’s arrival and its recordings becoming available are separate steps.
You can find your recording count and total listening time together beside Listen & organize, or just below the heading on a phone. The total includes all active recordings, even when you search or filter the list.
Find the message you want
Under Find a recording, enter a name or words, then select Search or press Enter. To search the words inside your existing transcriptions as well, check Include transcriptions before searching. The list changes when you run the search, so you can finish typing first. Choose Not yet listened or Favorites from the Show menu to narrow the list. When Review before publishing is on, you can also choose Awaiting approval.
Searching and filtering do not change your saved sequence. Select Clear filters before moving recordings into new positions.
Listen through your recordings
Select Listen through recordings to start with the first recording currently shown. Use Previous and Next to move through that list. Leave Play next automatically checked for continuous listening, or clear it to stop after each recording. Resume listening returns you to your saved listening place.
A recording is marked as listened when it reaches the end. You can also select Mark as listened, or use Listened · mark as new to put it back in your Not yet listened list. These listening choices do not approve a recording for public sharing.
Sections such as Transcription Tools, Add recordings from your device, and Trash & Restore have an arrow and Show beside the heading. Select anywhere on the heading to open it; select it again to hide the section. You can also use Tab to reach the heading and Enter or Space to open it.
Keep favorites and bookmark a moment
Select Favorite beside a message you want to find again. Select the arrow or My bookmarks – Show heading while listening, add an optional label, and select Bookmark this moment. Select a saved timestamp to return to that moment.
Favorites, bookmarks, and listening progress are private to your account login. Changing a title or sequence keeps them. They stay saved when your recordings are archived and restored. Return with the same account login to use them again. Editing the audio or restoring a recording from Trash resets its bookmarks, listened status, and listening place, while keeping its favorite status. Your audio downloads contain the recordings; these personal settings stay in your LifeOnRecord account.
Download the format you want
First, check the sequence of your recordings and wait for any changes to save. Recordings in Trash are left out.
| What you want | What to choose |
|---|---|
| One recording | Use that recording’s Download control in the list. |
| All recordings as separate files | In the Download section, select Download Individual Files. Your device receives a ZIP containing the individual audio files. |
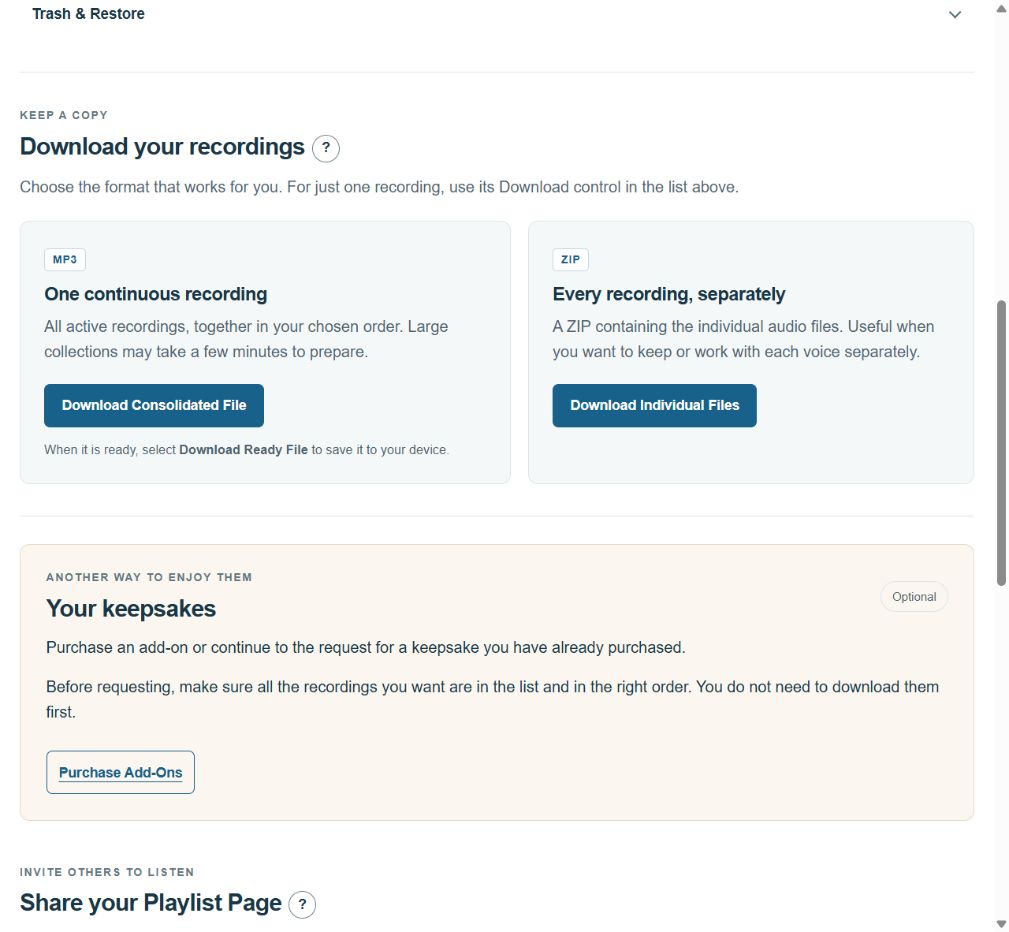
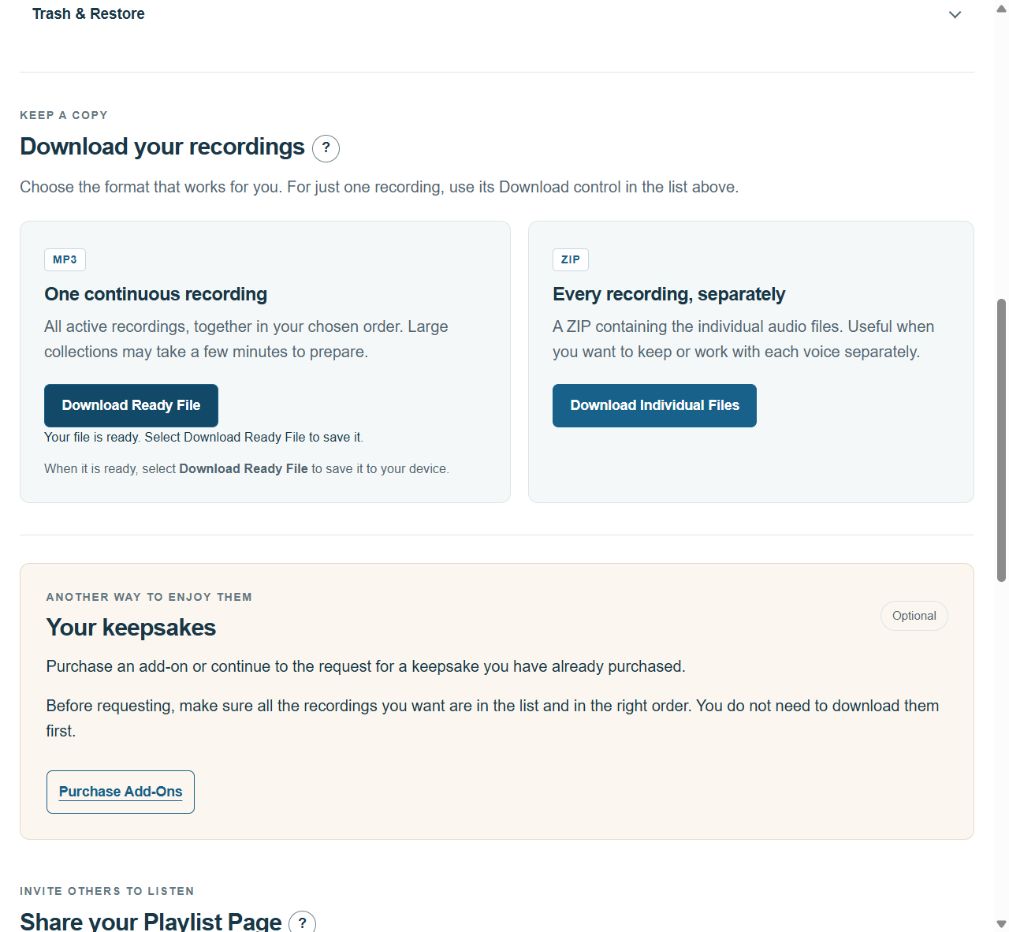
| One continuous recording | Select Download Consolidated File. When preparation finishes, select Download Ready File to save the combined MP3. |
A combined file needs time to prepare. A large collection may take a few minutes. Keep the page open and watch the preparation message. Preparation does not automatically download the file: when the button says Download Ready File, select it.
34 seconds. Captions are included. Press Play to start; pause or go full screen whenever you like.
Read the demonstration steps
- Check your recording sequence, then open Download. Your combined MP3 follows that sequence.
- Select Download Consolidated File. This first click prepares the file.
- Keep the page open while the file prepares. This wait is shortened. A large collection may take a few minutes.
- Look for Download Ready File. The file is ready, but it still needs to be downloaded.
- Select Download Ready File to save the MP3. This second click starts the download to your device.
- Check your device's downloads for the MP3. You can return to your recordings when you are ready.
If preparation reports a problem, follow the displayed retry instruction. If it keeps failing, contact support with your order number and the message you see. Do not remove recordings merely to make the download smaller.
Download just the recordings you choose
- In Listen & organize, select Select recordings to download.
- Check the recordings you want, or use Select shown after searching or filtering. The selected count tells you if any selected recordings are hidden by your filters.
- Choose Selected recordings as ZIP for separate audio files, or Selected recordings as one MP3 to join them.
- When preparation finishes, select Download selected file. If you leave the page, return using the same browser to check the saved download.
Selected downloads follow your saved recording sequence. They do not change your full collection or what goes into your keepsake. You can choose up to 500 recordings and 2 GB at a time. Prepared selections are available for 24 hours; if you edit the selected recordings, prepare a fresh download.
Add recordings from your device
- Expand Add recordings from your device below the recording list.
- Choose one or more audio files, up to 100 at a time. Each file must be smaller than 18 MB. Common formats such as MP3, M4A, WAV, and OGG are supported.
- Check the titles shown beside the files and make any changes you want.
- Select Add recordings and keep the page open. Each file shows its own upload and processing progress.
- If a file needs another attempt, use its Retry button. A retry checks the same file without adding a second copy. If you closed the page, choose the original files again in the same browser to continue the batch.
- Select Refresh recordings when the uploads finish, then arrange the new recordings and wait for the save confirmation.
Use Start another batch when you want to begin a separate upload. Keep your original files until the recordings are added successfully. Uploading is available while the account is receiving recordings; restored access is for recordings already in the account.
Recordings already in My Recordings do not need to be uploaded again. To supply vinyl cover text or a purchased cover photograph, use Send me my Keepsake(s) in Your keepsakes and complete that request form.
Read transcripts or make an audio edit
Available transcripts open automatically in My Recordings and on your Playlist Page, unless you have chosen to hide them. Your shared page shows transcript controls only where text is available. Use Hide all transcripts or Show all transcripts in My Recordings, or Hide transcripts or Show transcripts on the Playlist Page. Your browser remembers that display choice. A recording’s Transcript control opens or closes just its text.
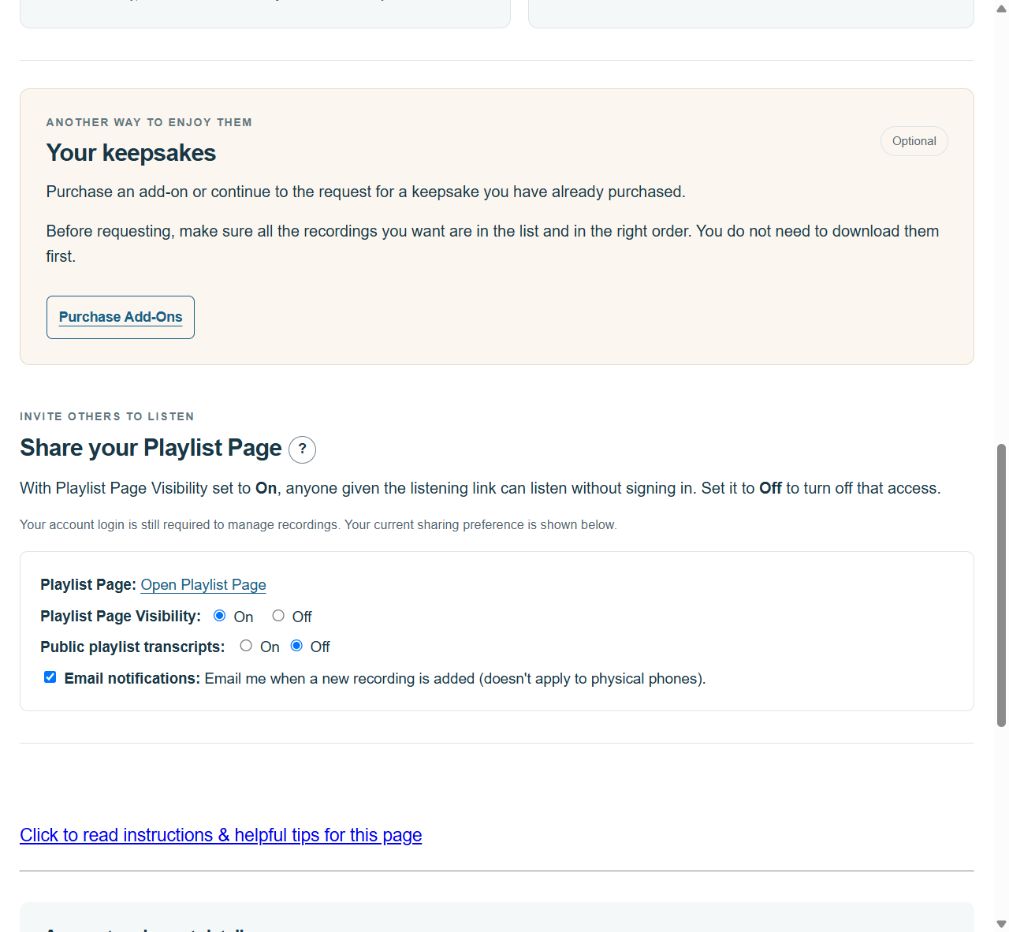
You can use Edit to correct transcript text and save it, or Copy to use it elsewhere. Under Transcription Tools, you can generate missing transcripts when that action is available and use Export transcripts for a document you can print or save. New phone recordings, including the Introductory Greeting, are transcribed automatically after processing. Guest recordings receive a suggested title when a transcript is available. The Introductory Greeting keeps its title, and any titles or transcripts you have edited are kept. Showing a transcript does not generate a new one. To keep transcripts off your shared page, set Public playlist transcripts to Off in the sharing section; an existing Off choice stays Off.
To shorten a recording or adjust its saved volume, open Trim & Amplify on a laptop or desktop:
- Select the part of the waveform you want to keep. Adjust the selection handles if needed.
- Use Preview to listen to the selection. Adjust Gain (dB) if you want the saved audio louder or quieter.
- Select Apply only when you are happy with the result, and wait for the completion message.
Reset clears an unsaved selection. Undo returns to the previous saved version. Restore Original returns to the unedited recording. Closing the editor does not undo changes you already applied. For Keepsake Speakers, leave about one second of silence at the beginning and end when trimming.
Your player’s volume control only changes playback on your device; it does not change the saved recording. If trimming is unavailable on your phone or tablet, switch to a laptop or desktop.
Purchase a keepsake or request one you have purchased
A Speaker or vinyl record is an optional way to enjoy your recordings. Purchasing a keepsake and requesting its preparation are separate steps.
To buy an add-on, use Purchase Add-Ons in Your keepsakes. If you have already purchased one, wait until all the recordings you want are present, put them in order, and move any unwanted recordings to Trash.
When you are ready, select Send me my Keepsake(s) and complete the request form, including your choices and shipping-address confirmation. Opening the form does not submit it. You do not need to download your recordings first.
After submitting a keepsake request, check for confirmation on the page. We will confirm shipment separately. If you are unsure whether your request went through, contact support before submitting it again. For vinyl, use that same request form to enter the text you want on the album cover and upload a photograph if you purchased the cover-photo option.
Vinyl has a 40-minute total capacity, with approximately 20 minutes on each side. If your selection is longer, contact support for help choosing a shorter selection or discussing another album. A Keepsake Speaker does not have that recording-length limit.
Before requesting a keepsake, check your titles and recording sequence, then listen to the opening and ending. Your keepsake uses all active recordings in their saved sequence.
Let family and friends listen
In Share, select your Playlist Page link to open the page your listeners will use. Your Playlist Page starts On. Arrange your recordings, then send its link when you are ready for others to listen.
Set Playlist Page Visibility to Off if you want to close the page, or On to let people with the link listen.
Choose what appears on your Public Playlist
Review before publishing is optional and starts off. Leave it off if you want recordings to appear as usual. Turn it on if you want to check each message before others can hear it.
- In Share, turn on Review before publishing. The first time, all existing recordings will wait for approval. New recordings will also wait.
- Listen in your recording list, then select Approve for Public Playlist beside the recordings you want to share. To approve several together, select them and choose Approve selected recordings. Select pending recordings selects those still waiting.
- Check the awaiting-approval count. Your own recordings and downloads remain available to you while you review.
When reviewing a listening list, Approve and play next saves the current recording’s approval before starting the next one. If approval cannot be saved, playback does not advance.
You can review while Playlist Page Visibility is Off. Approval does not turn your playlist On. When sharing is On, public listening, transcripts, and downloads include only approved recordings.
Changing a title or sequence keeps approval. Editing the audio, replacing a recording, or restoring it from Trash means it needs approval again. Use Withdraw approval to take a recording off the public playlist while keeping it in your account.
Turning review off can make unapproved recordings public; confirm only if that is what you want. Earlier decisions are remembered if you turn review back on.
Account and event details
Look in Account and event details for your invitation number, event information, receiving-message end date, and the availability of your saved recordings. Phone shipment and return details appear when they apply to your account.
The period for receiving new messages is separate from access to recordings you already have. During a restoration, Restored access ends shows the date and time your temporary access ends.
Restore archived recordings free for 30 days
If your account has expired and recordings are available to recover, open My Recordings and select Restore my recordings. Most restorations are ready within 10 minutes. You can leave the page; we will email you when yours are ready.
- Your 30 days begin when restoration finishes. You can listen, edit, arrange, and download your existing recordings.
- The page shows progress. If retrieval takes longer, it will say so while your recordings are retrieved and checked.
- Incoming recordings, the dial-in service, and public sharing stay closed.
- Another click during the same access window keeps the existing end date.
- We will email a reminder three days before the recordings are archived again. Save any copies you want on your own device before access ends.
- After re-archiving finishes, you can restore your recordings again free for another 30 days.
If the account is cancelled, refunded, or has a payment restriction, contact support about access. Restoration does not change those restrictions.
Get help
Communication Package materials depend on the optional package purchased for your order. Renting a phone alone does not include that paid package.
If a change has not saved, keep the page open and check for its save or error message. If a file has not appeared after an upload, check the upload result before trying again. For a problem you cannot resolve, email support@lifeonrecord.com with your order number, what you were trying to do, and the message shown on the page.