My Recordings is where you manage the audio messages in your LifeOnRecord order.
From this page you can listen, rename titles, reorder tracks, view/edit transcripts, trim & amplify audio,
and download files (individual or consolidated). The order you set here is the order used for downloads and keepsakes.
Use the numbered screenshot below as a map. Each red number is explained underneath.
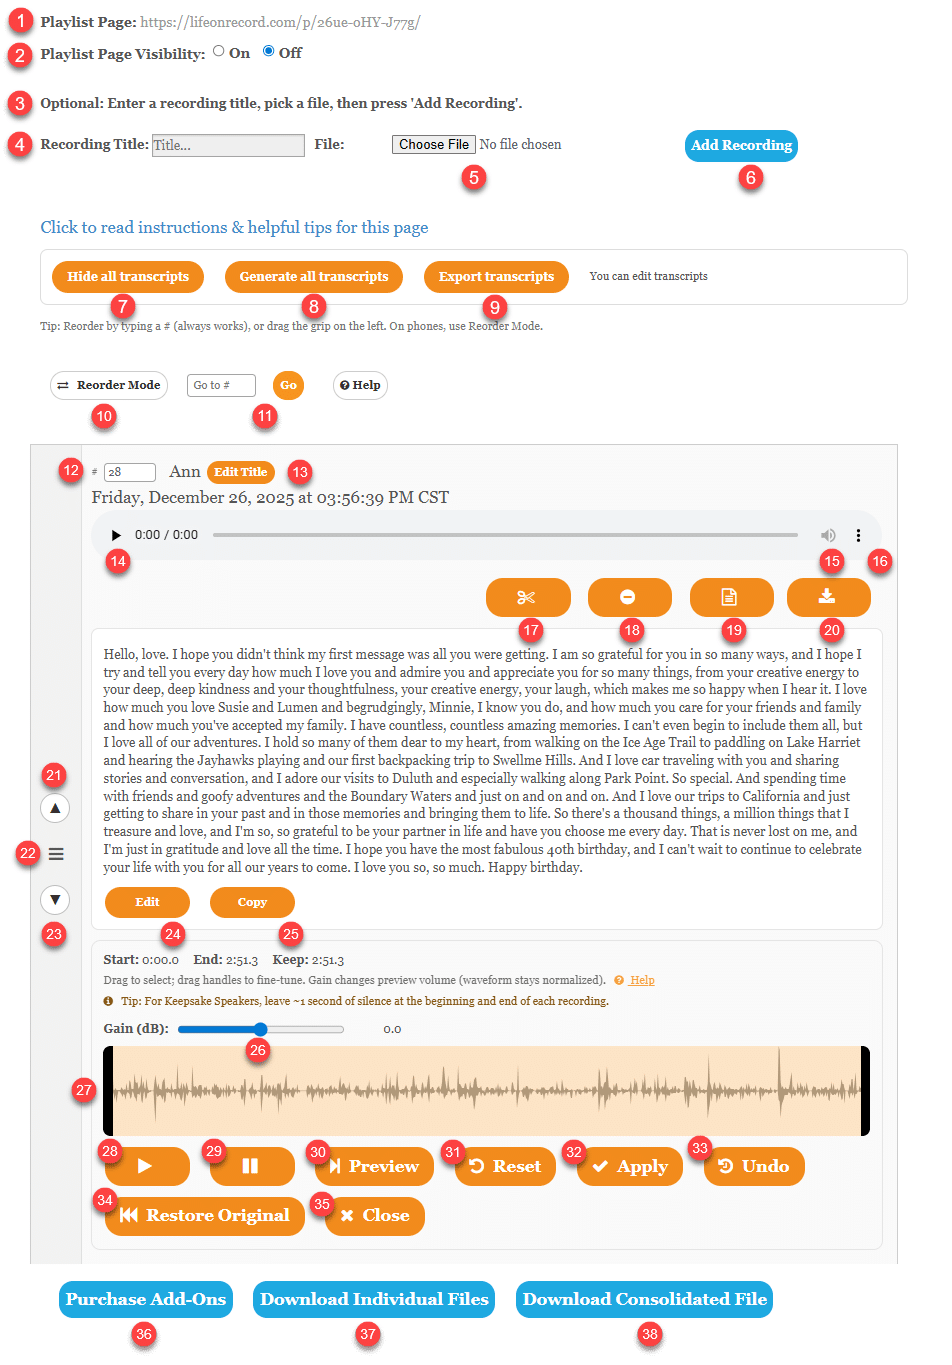
Controls on this page (by number)
My Recordings — Help Guide
My Recordings is your private workspace for this order. Here you can listen to each recording, rename and reorder them, view/edit transcripts, and (if you want) trim and adjust volume before downloading or requesting a keepsake.
Most changes save automatically. After you reorder or rename something, wait a few seconds and look for a small message near the top of the page that says Saving… and then Saved before refreshing your browser.
Reference image: Insert the numbered screenshot for this page directly below this line. Then use the guide below to match each number to what it does.
Quick tips (read this first)
- If something “doesn’t stick” after a refresh: wait until you see Saved before refreshing. Refreshing too quickly can cancel a save.
- Reordering on phones/tablets: Turn on Reorder Mode, then use the Up/Down buttons or the drag grip on the left.
- Track numbers always work: You can reorder by typing a new number in the # box, on any device.
- For Keepsake Speakers: if you trim recordings, leave about 1 second of silence at the beginning and end of each recording.
- Waveform trimming: works best on a laptop/desktop. If trimming is disabled on your device, you’ll see a message telling you to switch.
What each number means
- Playlist Page — This is your public playlist link for this order. You can share it with friends and family (only if the playlist is turned on).
- Playlist Page Visibility — Turns your public playlist On or Off. If you want privacy, keep it Off.
- Upload instructions — This section is optional. Use it only if you want to add your own audio file(s) to the order.
- Recording Title — Optional. Type a title for the upload (example: “Grandma’s message”). If you leave it blank, the title may default to the file name.
- Choose File — Select an audio file from your device to upload.
- Add Recording — Uploads the selected file. Keep the page open until the upload completes and the new recording appears in the list.
- Hide all transcripts — Collapses all transcript panels so the page is easier to scroll.
- Generate all transcripts — Creates transcripts for recordings that do not have one yet. This can take a little time, especially for longer recordings.
- Export transcripts — Creates a clean transcript “document” for the order so you can print it, save it, or copy it.
- Reorder Mode — A “turbo mode” for rearranging tracks, especially on phones. It collapses the rows and makes the reorder controls easy to use.
- Go to # — Jump to a specific track number. Type a number and press Go to scroll directly to that recording.
- Track # box — The track’s position in your order. To move a recording, type a new number and then click/tap outside the box. Wait for “Saved” before refreshing.
- Edit Title — Renames the recording title. Click once to edit, then click again to save. If saving fails, remove unusual symbols and try again.
- Audio player — Play the recording and scrub (move) through it. The player may look slightly different depending on your browser/device.
- Volume — Adjusts playback volume on your device (it does not change the saved file).
- Player menu — More playback options (varies by browser). This is part of the built-in audio player.
- Trim & Amplify (scissors) — Opens the waveform editor for this recording (trim start/end, preview the selection, and adjust gain/volume).
- Move to Trash (minus) — Moves the recording to Trash. You can restore it later from the Trash section.
- Transcript (page icon) — Shows or hides the transcript for this recording. Transcripts load when you open them.
- Download (down arrow) — Downloads this one recording to your device.
- Move up (up arrow) — Moves this recording up by one spot (helpful on phones/tablets and in Reorder Mode).
- Drag grip (three lines) — Drag the recording to a new position. In Reorder Mode you’ll see a clear “drop here” location while dragging.
- Move down (down arrow) — Moves this recording down by one spot.
- Transcript: Edit — Lets you edit the transcript text for this recording. After editing, use the on-screen Save/Cancel options that appear.
- Transcript: Copy — Copies the transcript text so you can paste it into an email, document, or notes.
- Gain (dB) slider — Makes the recording louder or quieter when you click Apply. The waveform picture usually stays the same (it is a “normalized” view), but the final audio volume will change.
- Waveform area — The visual shape of the audio. Drag across the waveform to choose what you want to keep, then fine-tune using the handles on the left/right edges.
- Play — Plays the recording in the editor.
- Pause — Pauses playback in the editor.
- Preview — Plays only the selected region (the part you plan to keep) so you can confirm it sounds right.
- Reset — Clears your current selection and gain changes inside the editor (this does not change the saved file on the server).
- Apply — Saves your trim and/or gain changes to the server. This may take a few seconds. Your previous version is kept so you can Undo.
- Undo — Switches back to the previous saved version for this recording (a quick “last change” undo). If you want the untouched original, use Restore Original.
- Restore Original — Restores the recording back to its original, unedited version (start over). Use this if you trimmed too much or want a clean reset.
- Close — Closes the waveform editor without saving anything new. (If you already clicked Apply, those saved changes remain.)
- Purchase Add-Ons — Takes you to options and upgrades you can add to this order.
- Download Individual Files — Downloads a ZIP of all recordings in the current order sequence.
- Download Consolidated File — Creates and downloads one combined MP3 in the current sequence. This can take a moment for longer orders.
Troubleshooting
- “My reordering doesn’t save” — After you reorder, wait for the page to show Saved before you refresh. If you are on a phone/tablet, keep the page open in the foreground for a few seconds after moving a track.
- Dragging feels hard to control — Turn on Reorder Mode and use the left-side drag grip. On phones, the Up/Down buttons are often the easiest.
- Renaming doesn’t save — Try saving again with simpler text (avoid unusual symbols). Then wait for Saved before refreshing.
- Trim button doesn’t open — If you are on a phone/tablet, trimming may be disabled. Switch to a laptop/desktop and try again.
If you still need help, please email support with your order number and a short description of what you tried (example: “moved Track 5 to Track 2, waited 10 seconds, refreshed”). We can quickly confirm what saved and help you get the exact sequence you want.